Long ago, I mentioned that I should start a series of articles entitled "A Bimbo's Guide To..." various things. I am not starting with "A Bimbo's Guide To Being A Bimbo," as originally intentioned, that one will have to wait for later. Instead I'm going to write a tutorial for editing LSL scripts on multiple machines, synchronizing them, and keeping them in a code repository. All tools and services I use are free and you don't need to setup any servers for yourself, its just a little bit of software installation and configuration.
I dislike editing code in most environments, I started with Emacs and I cannot get used to hitting arrow keys and other oddball keys on the edge of the keyboard to do the second most common thing in an editor, edit (the first is enter text). Why should I move my hands all the way over to the edge, then all the way back to the home position, just to move the cursor? But, I won't turn this into a diatribe on editors.
While working on scripts for Second Life, I have used a number of different tools and methods with varying success, but all of them seem clunky. Mainly, because I want to do things in the way most convenient to me and not jump through hoops. I'm a Mac user, I'm used to the computer working with me not against.
My requirements are simple ;)
- Does not require connection to Second Life to edit.
- Works on both Windows and Macs (work computer is Windows, home is Mac).
- Easy to synchronize code in progress between work and home computers.
- Easy tracking of versions.
- Testable without connection to Second Life.
- Easily import lots of scripts into Second Life.
- Supports Emacs key-bindings.
Mostly, I've cobbled together a set of tools, scripts, copy and paste, and other clunky things to achieve some of what I want. Well, I've started to use a better solution and I'm going to tell you how to easily set it up in this tutorial.
My current solution uses Eclipse, ByronStar, and Google Code Hosting, it doesn't meet all of my requirements, but it deals with the most annoying ones for me, code synchronization, code versioning, and a decent editor.
Eclipse is an open source Integrated Development Environment (IDE) for developing code in many different languages, it's a bit heavy weight for this, especially since it's written in Java, but if you already use it for other coding, then this is an easy extension to what you already do.
ByronStar is an Eclipse plugin that does syntax highlighting, code formating, and code completion for LSL scripts.
Google has a code hosting service that anyone can store code in, you can use other repositories, but this is one of the easiest and quickest to setup.
Here's how to get everything installed and configured.
Eclipse
- Install the Java Developer Kit, go to Sun's Java site, download and install the version appropriate for your operating system.
- Install Eclipse, go to the Eclipse download page and install the version most appropriate for your platform. The simplest would probably be the "Eclipse IDE for Java Developers" version.
That was easy, now to the configuration.
Eclipse Configuration
- Start Eclipse
- Select a directory to put your "workspace" (Eclipse lingo for the place you put your code).
Eclipse Plug-In (ByronStar)
- Select "Help" -> "Software Updates" -> "Find and Install"
- Select "Search for new features to install." Click "Next".
- Click the "New Remote Site" button (most likely on the right side).
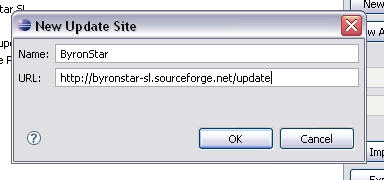
- Enter "ByronStar" for the name.
- Enter "http://byronstar-sl.sourceforge.net/update" for the URL. Click "Ok".
- Click the check box next to "ByronStar" in the Update Sites list.


Eclipse Plug-In (Code Repository)
- Click the "New Remote Site" button (most likely on the right side).
- Enter "Subclipse" for the name.
- Enter "http://subclipse.tigris.org/update/" for the URL. Click "Ok".
- Click the check box next to "Subclipse" in the Update Sites list.
- Click "Finish".
The Update Manager will find any updates and bring up the next dialog.
Installing The Plug-Ins
- Click the check box next to "Subclipse" and "ByronStar". Click "Next".
- Accept the terms of the license agreement. Click "Next".
- Make certain the two plug-ins are selected to install. Click "Finish".
- Wait.
- Click "Install All".
- Wait.
- You will be asked to restart Eclipse. Click "Yes".
Setup Google Code Hosting
- Go to the Google Code Hosting webpage.
- Sign into Google with your Google username and password.
- Click on the "Create Project" link in the lower middle of the page.
- I use a single project for all of my LSL code because Google has a lifetime limit of 10 projects per account.
- Fill in the "Project Name" - it use only lower case letters, numbers, and '-' character.
- Fill in the "Summary", "Description", and select the license for your code from the license drop-down.
- Alternately fill in any tags.
- Click "Create Project".
Configure Source Repository in Eclipse
You need to change your 'perspective' to the code repository one. This is Eclipse's way of saying that you change the interface to concentrate on the functionality centering around the code repository.
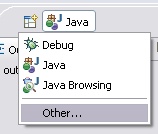
- In the upper right of Eclipse is a little icon with a plus sign, click on that and select "Other..."
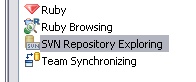
- Select "SVN Repository Exploring". Click "Ok".
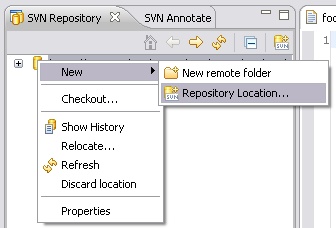
- In the "SVN Repository Window", right click, select "New" -> "Repository Location...".
- Enter "https://?????????.googlecode.com/svn/trunk/" into the URL field. Substitute the name of the project you created in Google Code Hosting for the question marks. Click "Finish".
- If you are asked for you username and password, enter your normal Google username, but the password is not your usual password, it's a special one for code hosting. Go to the code hosting settings page and get the proper password.
There you go, everything is hooked up. It's time to write your scripts.
Making a project in the repository
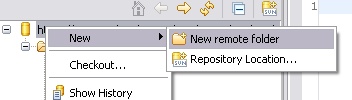
- Right click on your project's source code repository and select "New" -> "New Remote Folder".
- In the view of your folders, select where you want the folder and enter the name. Click "Next".
- Enter any comment about this folder you want. Click "Finish".
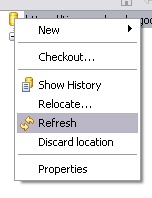
- You may not see your folder in the repository view. If you don't, right click the repository and select "Refresh".
Making the repository project an Eclipse project
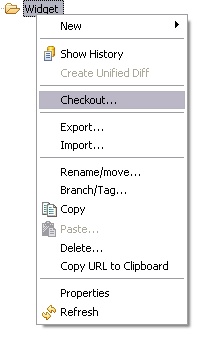
- Now that you have a folder for where to keep your files, right click on it and select "Checkout...".
- Since this is a new project, select "Check out as a project configured using the New Project Wizard". Click "Finish".
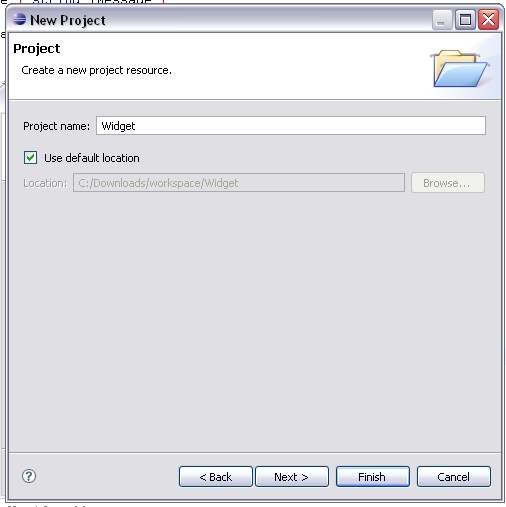
- Click on the little "+" sign next to "General" and select "Project". Click "Next".
- Enter a name for the new project. Click "Finish".


Finally! We are now at the point you can create your source files, edit them, and they will be stored in the repository.
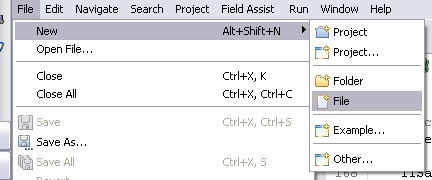
Creating a file
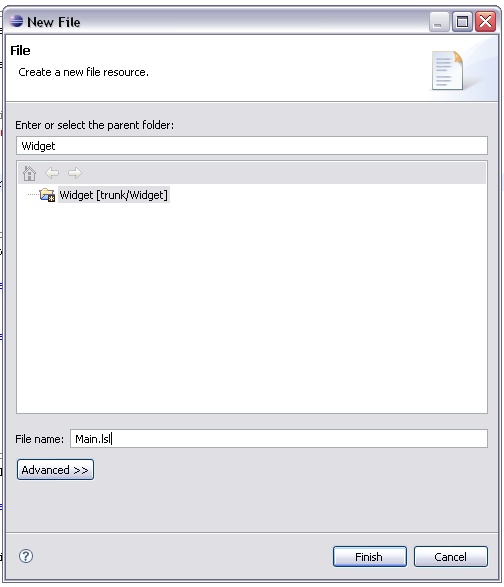
- Select "File" -> "New" -> "File".
- Select your newly created project.
- Type in the name of the new file. Click "Finish".
- Go to the upper right hand to change the perspective one last time, select "Other...".
- Select "Resource". Click "Ok".
You'll now be able to browse the project, edit the files, add more files, and generally do all of the coding you want. I also like to store my image files, configuration files, sound files, and animations in the same project folders, you can add those files to the project via the "File" -> "Import..." dialog.
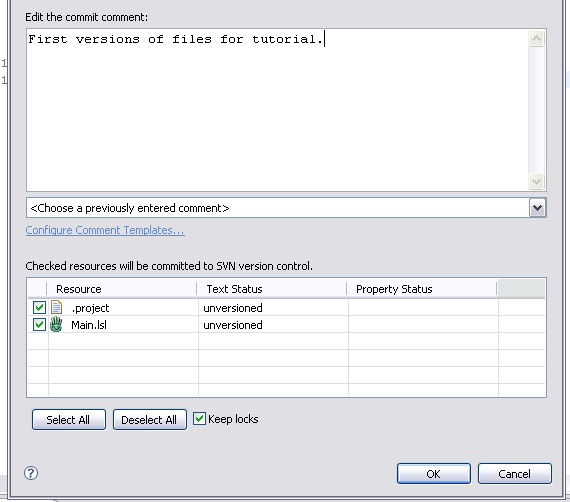
All of the changes you've made have been to your local copies of the files, you will still need to synchronize them to the server.
Saving the file to the repository
- Right click on the project and select "Team" -> "Commit..."
- Select the files you want to save to the repository. Click "Ok".

You will now be able to see the new files on the server in your code browsing, http://code.google.com/p/????????/source/browse - again change the question marks to the name of your project.
There wasn't that much easier than the alternatives? :)
Now, you have a setup that you can have on multiple computers and always share the most recent version of your code. Also, you won't lose your work in case you happen to overwrite a particular file with something wrong, you can always revert the change to a version on the server.
This is my first tutorial, if you find anything wrong with it, something isn't clear, or have suggestions for how to improve it, please leave a comment. There may be some minor visual differences between your version and mine, but hopefully, they shouldn't cause any problems.
I'm certain there is a large overlap between bimbos and power coders out there, so this tutorial should have a large audience considering the staggering numbers of Uber Cool Nerd Goddesses out there.


3 comments:
Very useful article. I'm going through the steps to set this up myself.
Ok, There were a few differences. Since I never had eclipse before, I was confused about a little icon with a plus sign in the upper right corner. My eclipse just had a big welcome page. Eventually I figured it out by clicking the "restore" icon in the upper right corner and that revealed the icon you mentioned.
Now ... is there a way to run and debug LSL scripts without being in Second Life?
I'm glad you found it useful.
I completely forgot about the "welcome page" that shows up. Arggh.
The only way I know to run scripts outside of SL is via LSLEditor, which does a credible job of it.
You don't even need to cut and paste code into it to use it with this setup. You can just open the code in LSLEditor and hit run.
You still need to cut and paste code into the SL client though.
*sighs*
Post a Comment